Looking for a one day sourdough bread recipe? This flexible one day sourdough bread can be made in 12 hours or 24 hours. This post is for anyone that’s tired or sourdough fails, starters that aren’t ready or think baking sourdough is too labor intensive. Stick around and we’ll simplify the process for you.
This one day sourdough bread is a basic loaf recipe that can be jazzed up with other ingredients. So, whether you want to make sourdough bread in 24 hours or 12, this recipe is for you. Here are some important topics we’ll be covering in this post:
We’ve got a fair bit to cover, so let’s start with some introductions with the star of our show: what is sourdough bread?
What Is Sourdough Bread

Sourdough bread is a type of bread that has been leavened naturally and can be made with 3 ingredients: flour, a starter, and water. Most breads use commercial or instant yeast which speed up the process and produce baked goods in hours. One day sourdough bread is achievable because this bread typically rests overnight for 12-15 hours or even 24 hours.
Sourdough bread uses wild yeast that is found in a ‘starter’. A starter can be made from scratch with flour and water. This mixture ferments and cultivates wild yeast which helps the bread rise when it bakes and gives sourdough bread its characteristic sour tang.
Before we get into more about a sourdough starter and how to make sourdough bread, let’s have a quick look at the equipment you’ll need.
Necessary Equipment

The key to sourdough baking is precision, consistency, and patience. You’ll need a few things to get started. Some of these equipment can be substituted and others are not. These are things you absolutely need:
- Glass jar
You’ll need any sort of glass jar to house your sourdough starter. It doesn’t have to be anything fancy. We’re reusing an old pickle jar but weck jars are very popular amongst sourdough aficionados.

- Scale
Precision is key in any baked good. For your sourdough to come out flawless, you’ll need a scale to get the measurements down to every gram.
- Flour
Choose from all-purpose, whole wheat, spelt, mixed flours, bread flour, whatever type of flour you want to use as long as it’s not bleached. You’ll need flour to feed the sourdough starter and to make bread.
- Dutch oven
Unlike conventional bread, sourdough is baked in a dutch oven or bread pan. This is because the dutch oven creates steam that will ensure a perfectly risen sourdough loaf. You can also opt for a bread pan with a cover. If you want to make sourdough bread but don’t have a dutch oven, try using one of the 9 ways to make sourdough without dutch oven guide!
This list of equipment is nice to have but not mandatory:
- Banneton basket for proofing
Banneton baskets are oval or round wooden baskets with cloth that help the sourdough keep its shape while it proofs. They aren’t too pricey but if you’re starting out with low costs then use a bowl and small cloth. Here’s an example:

With your equipment at the ready, let’s talk about what makes this whole sourdough process happen: the sourdough starter.
What Is Sourdough Starter

A sourdough starter is essentially wild yeast. It’s made from water and flour which is left to ferment and cultivate a community of bacteria (lactic acid) and wild yeast. A good sourdough starter is essential because it’s 1 of 3 ingredients that go into a bread AND it’s the leavening agent that makes the sourdough rise.
If you’re starting a sourdough from scratch, this mixture of flour and water takes about 7-10 days before it’s ready to use. A portion of the starter is removed and the remainder is kept. The ‘old’ starter is fed with more water and flour. This process is repeated over the course of 7-10 days and sometimes 2 weeks to achieve a strong and active starter.
Want to learn how to make a basic sourdough starter? Go on right ahead to the next section to learn how we made ours.
Foolproof Sourdough Starter From Scratch

There are so many recipes out there on how to make sourdough starter. The whole point of sourdough is to make the most out of what little you have. It’s easy to complicate the process.
One of the easiest sourdough starter instruction guides we’ve seen is Joshua Weissman’s sourdough starter. A few things didn’t work for us but we’ve taken some of the internets’ tips and combined it to ensure you get a strong starter with minimal effort.
P.S. : We know measuring ingredients and the metric system can be annoying but please use a scale and grams for this process. This isn’t a suggestion or recommendation, it is essential to creating a strong and stable sourdough starter.
We used spelt flour to begin our sourdough starter so this makes it a spelt flour sourdough starter. But you can use regular wheat flour or all-purpose flour if you want. The sourdough starter recipe we started with looks like this:
- Day 1: Add 100 grams of flour + 150 grams of lukewarm water to a jar and mix.
- Day 2: Keep only 70 grams of mature (old) starter + add 100 grams of flour + 115 grams of lukewarm water.
- Day 3: Repeat steps from day 2.
- Day 4: Repeat steps from day 3 but decrease the water to 100 grams.
- Day 5: Repeat step from day 4.
- Day 6: Keep 50 grams of mature (old) starter + add 100 grams of flour + 100 grams of lukewarm water.
- Day 7: Keep 35 grams of mature (old) starter + add 50 grams of flour + 40 grams of lukewarm water.
Here’s what our sourdough starter looked like from day 1 to day 10:
Sourdough Starter Days 1-10: Picture Guide
1st Day

2nd day

3rd day
The brown liquid called, “hooch” appears. We kept the mixture but discarded the hooch

4th Day
More hooch on day 4. Instead, we decided to stir it all together and continue with feeding as usual.

5th Day

6th Day
Things are looking normal and there’s lots of activity

7th Day

8th Day

9th Day

10th Day

If your starter isn’t as active, repeat the steps from day 7 for a few more days until you achieve the results you’re looking for. We understand that this may seem like navigating in the dark because we’ve been there. So, to help us all out, here’s a helpful FAQ about sourdough starters.
Sourdough Starter FAQ
It’s as easy as one, two, three, right? Flour, water, and 7-10 days should do the trick. Well, sometimes you’ll hit a few curve balls like this:
How Often Do I Need To Feed My Starter?
You need to feed your sourdough starter every 12 to 24 hours. Remember to keep your sourdough starter at room temperature when you are beginning to cultivate it.
But you can’t keep feeding this thing for the rest of your life. Not everyday, at least. You can store your mature starter in the fridge and feed it weekly. Just remember to leave it out for 12 hours after the feeding before moving it back to the fridge.
Do I Have To Discard Sourdough Starter?
Yes, you do need to discard a portion of your starter before every feeding. Discarding your starter is essential and necessary to building a strong starter. Some people have used their discards and cooked them in order to avoid waste. We’ve tried it and it was meh.
Can I Stir My Starter With A Metal Spoon?
Yes, you can! We’ve noticed a few posts stating that you absolutely cannot use a metal spoon. This is because a sourdough starter is made from acid and this reacts to metals. BUT as long as your sourdough starter isn’t kept in a metal container, you’re fine.
You can use a wooden spoon or rubber spatula but honestly, it doesn’t matter what you stir your starter with. We use a single chopstick. Simple, yet effective and very easy to clean.


What Is The Brown Liquid In My Sourdough Starter?

That stinky brown liquid coming from your starter is called, “hooch.” Hooch is created by the sourdough starter when it’s used up all of its food. Which means your sourdough starter is hungry and it’s time to feed it more flour and water.
Hooch is generally used for bootleg alcohol and your sourdough starter is making its own hooch (it’s alcohol) because it is a byproduct of the fermentation process.
There’s a few consensus about what to do with the hooch: pour it out or stir it back in. We poured ours out but it moved from the top to the middle. So, we tried stirring it back in and voila. It was all good from there.
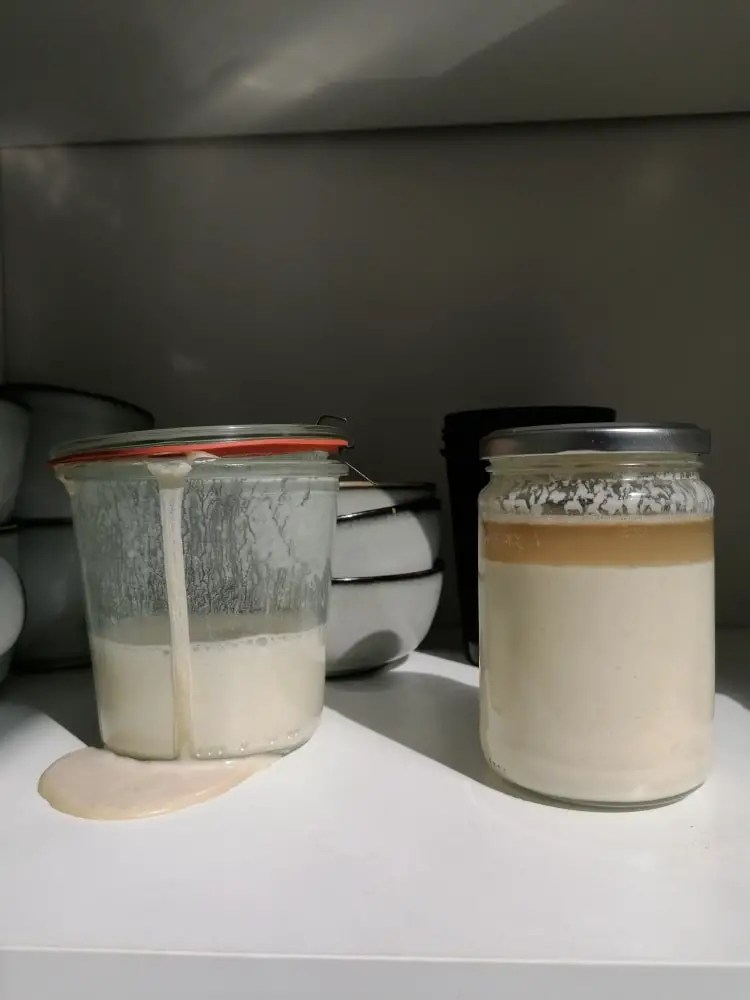
How To Tell If My Sourdough Starter Is Ready?
Your sourdough starter is usually at its peak after 2-4 hours from feeding time. But the best way to tell if your sourdough starter is ready is to do the float test. Simply fill a glass up with water and add a small bit of your sourdough starter into the glass. If it floats, it’s ready to use.


If your sourdough starter sinks to the bottom of the glass, like this:

Keep feeding and waiting for the sourdough starter to grow a little stronger. When you’re confident in your sourdough starter, the next thing you need to do is work the loaf into your schedule. We do that with something called a baker’s schedule.
Baker’s Schedule

Making a one day sourdough bread is about timing. The whole process takes minutes but the leavening time is long. A baker’s schedule will help you work your sourdough into your schedule. You can choose between a cold rise and a warm rise depending on what your schedule looks like.
Cold Rise (24 Hours)
This sourdough bread recipe was made using the cold rise method. A cold rise takes 24 hours. The sourdough is left for 12 hours at room temperature to rise. You want to do this in the morning so that you can move it to the fridge.
You can shape your loaves and let them rest in a banneton basket or any bread mold you have. After which you must move your sourdough to the fridge and let it rise for another 12 hours.
“Should I bake sourdough straight from the fridge?” is a common question and the answer is yes. You can bake your sourdough straight from the fridge. Make sure your oven and dutch oven is HOT and pop that baby in there to bake.
This method is best if you don’t want to spend the evening baking or would like to make bread on the weekend.
Warm Rise (12-15 Hours)
A warm rise is done in 12 hours at room temperature. We like to do this in the evening, get a good night’s sleep and wake up the next morning to a beautiful dough. After 12 hours, it’s essential to shape your dough and leave it to rest for an hour or 3. You can bake the bread when it’s had some time to rest.
Now, enough talk. Let’s have a look at how this one day sourdough bread is actually made.
Make This Basic One Day Sourdough Bread
The sourdough recipe for this bread is straightforward. Mix in the water, flour, and starter in a bowl:

Knead the mixture until it’s combined:

Leave the sourdough bread mixture to relax for 30 minutes or so before adding a few folds and shaping it into a ball. Repeat this step until the dough is smooth.

Choose your rising method, shape your sourdough bread and rest accordingly. Preheat your oven to 220c/428f. Once it’s hot enough, heat your dutch oven in your oven for roughly 30 minutes. Bake the loaf for 25 minutes with the lid on. Remove the lid and continue to bake for an additional 20 minutes or until it has browned.

You can use this basic one day sourdough bread to make any flavoured sourdough bread you like! Here are a few options:


Cranberry & Blueberry Sourdough Bread With Black Sesame

Goat Cheese & Cranberry Sourdough Bread

And our personal favorite, goat cheese and cranberry.
There you have it folks, a one day sourdough bread recipe in 12 hours or 24 hours. We hope this sourdough guide was helpful and that you are one day closer to making your own sourdough loaf. It may sound tedious and time consuming but in reality it’s just a lot of waiting.
Everything from the feeding process, to making the one day sourdough bread takes minutes. Creating a mature starter from scratch, waiting for the bread to rise, that takes time. Let us know in the comments below which rising method you prefer, if you’ve had any issues with your starter, or which sourdough combination is your favorite!

Basic One Day Sourdough Recipe
You can absolutely make sourdough bread in a day! Our one day sourdough bread recipe is perfect if you only have 12 hours or 24. This basic sourdough recipe can be customized and produce amazing sourdough bread flavor combinations.
Ingredients
- 407 grams flour (all-purpose, wheat, spelt, bread flour)
- 8 grams salt
- 50g sourdough starter
- 225 grams cold water
Instructions
Add the flour, water, and sourdough starter into a bowl and mix everything together until it forms a dough.
Leave this dough to rest for at least 12 hours at room temperature.
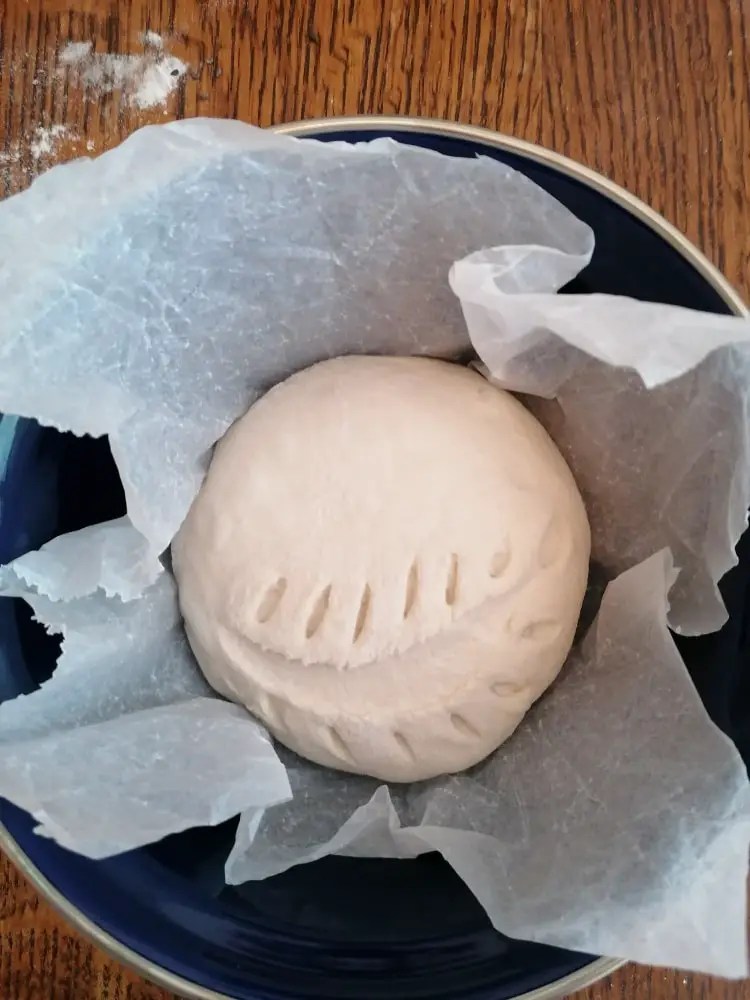
After 12 hours, you can shape the dough into a loaf. Ideally, you want to fold the dough into itself to create a round shape.
Heavily dust your proofing basket or a bowl lined with cloth. This will prevent the dough from sticking to the proofing basket or cloth. Don't worry about using too much flour, it can always be brushed off later.
WARM RISE (12-15 hours):
Let the dough rest for 2-3 hours in the proofing basket and cover with a damp cloth
COLD RISE (24 hours):
Let the dough rest in the fridge for 12 hours in the proofing basket (make sure to cover it with a damp cloth).
You can bake the sourdough bread immediately from the fridge.
Preheat your oven to 220c or 428f with your dutch oven or bread pan inside for 30-40 minutes.
Transfer your sourdough loaf onto a piece of baking paper.
Before placing the sourdough loaf into the pan, score the surface with a sharp blade.
When the bread pan is hot enough, lift the baking paper and place the sourdough in the dutch oven or bread pan and bake with the lid on for 25 minutes.
Remove the lid and continue baking for an additional 20 minutes or until a deep shade of brown.
Allow to cool on a rack for 10-15 minutes and enjoy!
Notes
You can use all purpose flour in place of bread flour BUT remember that substituting all purpose flour for bread flour means that you need to reduce the amount of water. This is because all purpose flour absorbs less water compared to bread flour. This can result in a gooey and sticky dough. Add the water a little at a time and stop when the mixture forms a dough.


4 Comments
Jacqueline Flack
June 6, 2024 at 12:27 amSo is this active starter just learning
yummyble.food
July 1, 2024 at 9:59 amHi Jacqueline! An active starter means that it has been fed within the past 12 hours.
Julie
July 26, 2024 at 2:54 pmCan you make this in a loaf pan?
yummyble.food
November 8, 2024 at 10:27 amYes you can!